

How To Create Wireless Network Windows 10
Wireless networks allow you to piece of work independently – without the tension of plugging in long wires that non but look bad in the house but besides are a rubber hazard. Since wireless signals travel in all directions and travel fast, you can use a wireless network to piece of work from your bedchamber or the porch of your dwelling. This commodity explains how to set up a wireless network connection in Windows 11/x/8/7.
Inventory required to Fix Wireless Network Connection
Since we are talking of a completely wireless network, we need the following items to set a wireless network connexion:
- An operating system that supports wireless networking. Windows is a practiced operating system that allows you to create wireless networks without any issues.
- A fast Internet connection: You can go for either a DSL or cable broadband. In nigh cases, the cable or DSL router (run into point three beneath) is provided by the ISP who as well sets up an Internet connection. Unremarkably, the connection from the wall jack (in the case of DSL) and hub (in the case of cable) is wired to the router from where wireless signals have over for advice.
- A wireless router: Since nosotros need a wireless network, nosotros volition need a wireless router. Bank check to see if your Internet service provider tin give you lot 1. If not, yous tin can get a wireless router from whatsoever computer marketplace. Make sure you buy a reputed product for better results. Routers are available in different technologies. I propose 802.11g or 802.11n for meliorate connectivity and good signals. Routers using the mentioned technologies are more compatible with network adaptors of different companies. Make sure that y'all are buying a wireless router and not wireless admission points. The latter is used to expand existing wired networks and does not serve the purpose of wireless routers.
- Wireless Adaptors: Most computers at present come with built-in wireless adaptors. They are ordinarily towards the front of laptops and computers and carry a switch that you can plough on and off to enable and disable network connectivity. If your figurer does not have 1, y'all can buy wireless adaptors from a computer shop. I suggest that y'all buy USB wireless adaptors every bit they are quick and easy to install. Also, you can employ them with different computers, unlike the carte du jour-blazon adaptors that need to be installed on the motherboards. Also, when ownership wireless network adaptors, make sure they match the network technology of the router you are using in the network. That is, if yous are using an 802.11n router, your network adaptors should as well be 802.11n. This ensures better connectivity.
To check if your computer has wireless network adaptors, proceed with the following steps:
- Open Control Panel
- Double click Network And Sharing (bachelor nether Network and Cyberspace if you lot are using Category view)
- In the left pane, click on Manage Network Adaptors
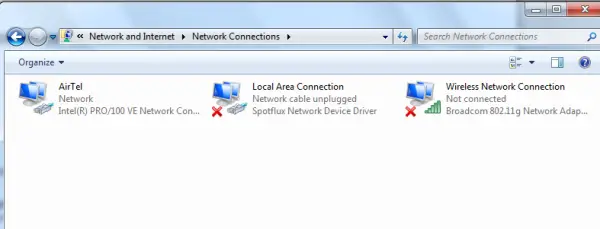
- If your computer has a wireless network adaptor, it will show you a network icon saying Wireless Network Connection.
Setting Up Wireless Cyberspace Connection on Windows PC
Well-nigh of the ISPs set upwardly an Internet connectedness when you take a new connection. If your Internet service provider did not fix the Internet for you, follow these steps (assumes your modem includes a wireless router):
- Plug one end of the phone wire into the telephone jack provided on the router'southward back
- Plug the other end of phone wire into wall jack of telephone connection. If you are using a splitter, connect this end of phone wire into the splitter socket that says DSL. You can then use another phone wire to connect the splitter to the wall jack of the phone
- Plug the router into an electrical socket.
- Turn on the main reckoner that you lot will utilize to set up admin privileges.
- Open Control Panel. If it is not in the Icon view, switch to the Icon view.
- Click Network And Sharing Eye
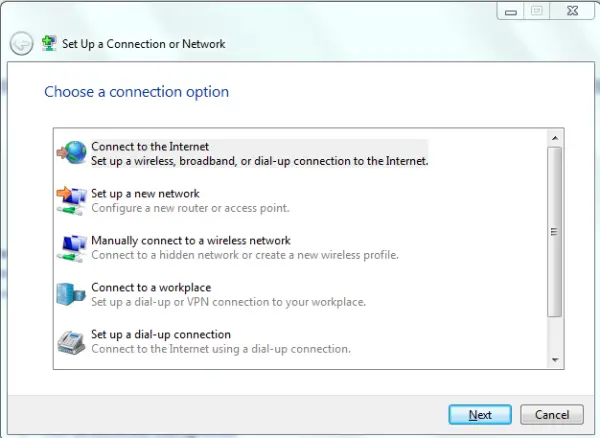
- Beneath View Your Active Networks, click Setup A New Connection or Network
- Double click Connect To Internet and follow the steps in the Sorcerer
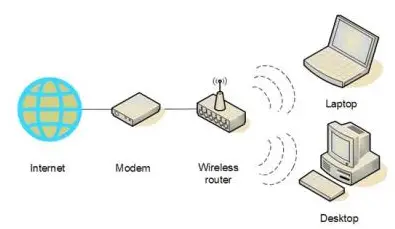
If your modem is different from a wireless router, you will need to connect phone wire – one end into the modem and another end into phone jack or splitter. You can then connect the modem to a wireless router using a network cablevision. Yous can then follow the steps 4 to 7 mentioned above. It should look somewhat like the image below.
At this signal, your main reckoner should be able to connect to the Net. If it is non connecting to the Internet, the connections must exist incorrect. Cheque the Network and Sharing window in Control Panel to see if Windows seven tin detect the wireless network (run into figure 1 above). If not, make sure the modem/router is properly connected and switched on.
Related: How to add a new Wi-Fi Network Profile in Windows 10.
Securing The Network
Assuming that the master computer is now able to connect to the Net, we will go alee and configure the network for security.
- Click the Network icon in Windows system tray
- Click Open up Network And Sharing
- Click Setup A New Connection Or Network
- Double click Setup A New Network
- The wizard will walk you through a series of steps to configure your network
- If your router supports WPA2, the wizard will bear witness it in the listing under Security Level. Gear up the Security Type to AES. Type a password under Security Primal and click Next
- Copy the security key to some safe place and then that you tin use it when setting upwardly other computers in the network. You will too need it later when you lot wish to make changes to the network
Setting Up Other Computers On The Network
- Click the Network icon in the Windows Organisation Tray
- Select your network (recognized by the name y'all provided in the wizard above)
- Windows will ask you for the password. Enter the password yous saved in step 7 above.
Setting Upwards Sharing On The Network
You have to plow on sharing on all computers, including the ones having devices such as printers and scanners and so that you can use them from any computer on the network. The following applies to each computer on the network
- Click the Network icon
- Click Open Network and Sharing Eye
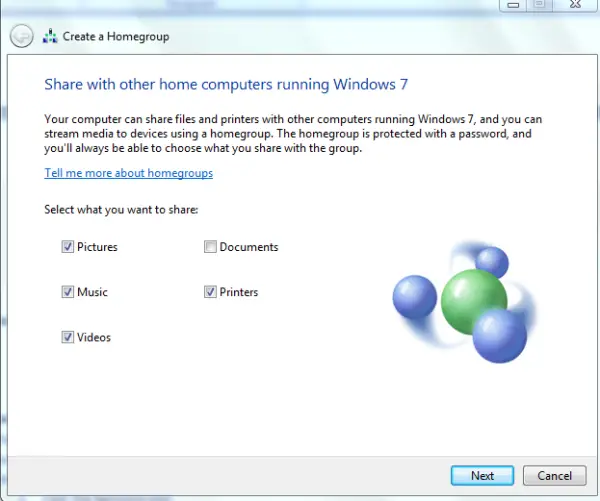
- Click Choose Homegroup and Sharing Options. A magician will walk you through setting up sharing for files and devices fastened to the figurer.
Note that you lot can share files by copying them into Public binder in Windows vii. The Public folder is available in C:\Users folder.
This explains how to set up a wireless network connection in Windows 11/x/viii/7. If you confront whatsoever issues, nosotros will be happy to assist. Just drop a note in the comments stating the trouble and your version of Windows.
Related read: How to set up a Broadband (PPPoE) connection in Windows.


How To Create Wireless Network Windows 10,
Source: https://www.thewindowsclub.com/set-up-wireless-network-connection-windows
Posted by: mckinnongreaboy.blogspot.com
0 Response to "How To Create Wireless Network Windows 10"
Post a Comment