

How To Install Cisco Vpn Client On Windows 8
The Cisco VPN client is i of the almost pop Cisco tools used by administrators, engineers and end-users to connect to their remote networks and access resources. This commodity shows how to fix the Cisco VPN Client Fault Reason 442: Failed To Enable Virtual Adapter when trying to connect to a remote VPN Gateway or Router from the Windows eight operating system (32bit and 64bit).
With the introduction of Windows 8, Cisco VPN users are faced with a problem – the Cisco VPN software installs correctly but fails to connect to any remote VPN network.
Windows seven 32bit & 64bit users dealing with the same problem tin can refer to our Troubleshooting Cisco VPN Client - How To Set Reason 442: Failed to Enable Virtual Adapter article.
Windows 10 32bit & 64bit can read our article Install & Fix Cisco VPN Client on Windows 10 (32 & 64 Bit). Fix Reason 442: Failed to enable Virtual Adapter.
Windows 10 32bit & 64bit Anniversary Update 1607 users tin read our Ready Cisco VPN Client Break After Windows x Anniversary Update 1607.
When trying to connect to a VPN network through a Windows eight operating organisation (32 or 64 bit), the Cisco VPN client volition fail to connect. As soon as the user double-clicks on the selected Connection Entry, the VPN customer volition brainstorm its negotiation and asking the username and password.
As soon every bit the credentials are provided, the VPN customer shows the well-known "Securing communications channel" at the bottom of the windows awarding:
 - Reason 442: Failed To Enable Virtual Adaptor - How To Fix It") After a couple of seconds the Cisco VPN client will timeout, fail and eventually the connection is terminated. The user is so greeted by a pop up window explaining that the VPN failed with a Reason 442: Failed to enable Virtual Adaptor error:
After a couple of seconds the Cisco VPN client will timeout, fail and eventually the connection is terminated. The user is so greeted by a pop up window explaining that the VPN failed with a Reason 442: Failed to enable Virtual Adaptor error:

Note: It's ever a not bad thought to take the latest Cisco VPN client installed. Users can download the Cisco VPN client for Windows, Linux and MacOS operating systems by visiting our Cisco Tools & Applications download section.
Introducing the Fix – Workaround
Thankfully the set up to this problem is simple and tin be performed even by users with somewhat limited experience.
Here are 4 easy-to-follow steps to the solution:
1. Open your Windows Registry Editor past typing regedit in the Run prompt.
2. Browse to the Registry Key HKEY_LOCAL_MACHINE\Organization\CurrentControlSet\Services\CVirtA
3. From the window on the right, select and correct-click on DisplayName and choose Modify from the menu. Alternatively, double-click on DisplayName:

4. For Windows 8 32bit (x86) operating systems, change the value data from @oem8.inf,%CVirtA_Desc%;Cisco Systems VPN Adapter to Cisco Systems VPN Adapter.

For Windows eight 64bit (x64) operating systems, modify the value data from @oem8.inf,%CVirtA_Desc%;Cisco Systems VPN Adapter for 64-flake Windows to Cisco Systems VPN Adapter for 64-bit Windows (shown beneath):
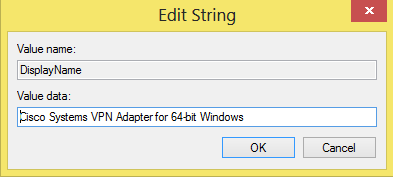
When washed editing the Value data, click on OK and close the Registry Editor.
Y'all can now run the Cisco VPN Client and connect to your VPN network. Changes performed do not crave a system restart.
Dorsum to Cisco Services & Technlogies Department
Source: https://www.firewall.cx/cisco-technical-knowledgebase/cisco-services-tech/942-cisco-vpn-client-windows8-fix.html
Posted by: mckinnongreaboy.blogspot.com
0 Response to "How To Install Cisco Vpn Client On Windows 8"
Post a Comment